There is great happiness in not wanting, in not being something, in not going somewhere...

Tuesday 24 December 2013

Oh Holy Night......

 
O Holy Night! The stars are brightly shining,
It is the night of the dear Saviour's birth.
Long lay the world in sin and error pining.
Till He appeared and the Spirit felt its worth.
A thrill of hope the weary world rejoices,
For yonder breaks a new and glorious morn.
Fall on your knees! Oh, hear the angel voices!
O night divine, the night when Christ was born;
O night, O Holy Night , O night divine!
O night, O Holy Night , O night divine
 
 
Christmas is possibly my favourite time of year, the decorations, the carols, the food( oh the food...), the tree, the general halabaloo of people as they rush around making sure every present is bought, Christmas cake made, Christmas cards sent to loved one both near and far!
 
It is a time of tradition! Family traditions are carried down from generation to generation.... new traditions are created and old traditions adhered too! It is a time of family gatherings, often, seeing family that you only see once a year, at Christmas, but like old shoes you are comfortable with, families just  seem to fit.....Have fun, play games sing together!(no matter how bad your voice is) Laugh with each other and most important of all, LOVE one another.
 
 
Deck The Halls


Christmas with a child is a blessing! I think I had  forgotten the wonder of it all. Listening for Santa's bell's on Christmas eve, cookies that you and you child had specially baked, carrots for Rudolph, Dancer, Prancer, Blitzen and all the others,  Twinkling Christmas lights on the tree, new pyjama's, leaving milk and cookies for Santa  and trying so hard to stay awake to see the Jolly Santa - but failing and slipping into dream land while wondering if Santa got your letter? Waking up at the crack of dawn on Christmas morning, then sneaking through to the lounge to see if Santa had really been , screams of delight because he had left heaps of presents, he had left foot prints and had actually eaten all those cookies you had baked....  


With Boughs of Holly

Our Christmas lights are up, our tree is decorated, the presents are bought and wrapped, our wonderful family has arrived safely! And Little Madame is so excited she could burst... She is tracking Santa on the iPad as I type this!


And Lights....

Carols are playing, and gorgeous smells are coming from our kitchen.....


Falala..La..La..La...Laaaaaa!
 
All that remains is for me to wish you all a Blessed and Peaceful Christmas, Filled with Joy, Love and Hope..... and may all your Christmas wishes come true! Merry, Merry gorgeous Peeps xxx


All I want for Christmas.....


All I want for Christmas is one last ingredient.... What??? I hear you all ask? Well let me explain, in our family we have a tradition, we bake a certain cookie every year, as a matter of a fact Christmas cannot go by with out these particular cookies.... I think there would be riots and strikes in our family were the cookie jars not filled with them on the 16th of December each year..... My grandmother Nanny, baked them , my mother and Aunt baked them, alas my Aunt has gone off to her family in another part of the country( how rude).... And as you all know my mother(insert sad face here) passed away this year  and so it has fallen on my shoulder to make them.....
 
They are called Soetcookies, no one quiet knows how come these yummy spicy little cookies are our particular choice of Christmas cookie but they just are...... We all love them! A lot!
  
   
Soetcookies
  
So promptly and dutifully on the 16th of December, I got out the recipe book and got started, I did everything by the book exactly as my mother had written it down, they smelt great and looked good......  
 
But Houston, I had a problem...
 
At round about the same time my brother called me, he had decided to make the Soetcookies too but had also hit a problem, the exact same problem.... the dough was crumbly, and you could not roll it out, at all......
 
Crumbly....
 
My sister and I pondered this dilemma over a cup of coffee and decided that we would add milk bit by bit until the consistency was good to roll..... it worked.... Thankfully as riots and strikes over Christmas would just not do!
 
That's Better....
  
So I am sure that by now  you want the recipe....
 
 Our Family's Soetcookies
 
4 pounds Flour
2 pounds Brown Sugar
1 pound Butter
3 Eggs
2 tsp of Bicarb in Milk
1/2 Cup of Brandy
2tsp Cinnamon
2tsp Mixed Spice
1 tsp Cloves
2 tsp Ginger
salt to taste
 
Cream the Butter and sugar
Add the rest of the ingredients
Roll out and cut out Christmas shapes
Decorate with nuts and cherries(the traditional thing, I decided on Christmassy M&M's)
Bake for 10 to 15 min at 170 degrees Celsius
 
And as always..... Apply to mouth.....
 
M & M's

Baked
 
They WORKED thank Heavens.... And are SUPER  YUMMY! Cindy and I  have had more long conversations about the recipe, and have decided that we need to use a half a cup of milk to dissolve the Bicarb and we also doubled up on the spices.... to make them more spicy of course....
   
A Heap of Yumminess
 
And so Mommy, if there is anyway for you to let me know..... All I want for Christmas is that missing ingredient..... Please ... If you could......Oh and STOP laughing at us! xxx
   
A Beautiful Rose
PS : 1 pound is equal to 500g according to one of  my recipe book


Saturday 21 December 2013

Crafty Christmas.....

Sometime one has to pull a rabbit out of a hat, especially when sweet little girls get a bit bored on a play date..... One such occasion happened a few days ago when one of Little Madames friends came to play and asked to do some crafts, This little angel is so sweet and absolutely loves to craft just like Little Madame. Nothing crafty was planned, and rabbits had to be pulled! BUT luckily for me, I had a few thing lying around(Yes.... just lying around... glitter is a staple in my home) So here is possibly the easiest and quickest crafty little number for you to try.  
 
It really is very simple, you need 5 things and I bet, that bar 1, you have them all lying around...
 
Glitter
Jars(like Jam jars)
Some cheap ornaments or plastic figurines
Water
Super glue(normal craft glue works just fine - but you have to wait for it to dry!)
And the last thing - and honestly you don't reallllyyyy need it -
Glycerin
 
 
The Things You Need

Have you guessed what we are making yet?


Glued
 So .....
Step 1 - Using the super glue, glue your ornament to the DRY lid of the jam jar( I did this for them... don't want little finger permanently stuck to lids)

Step 2 - Add the glitter - we used stars and white glitter

 
Glittered

Step 3 - Add the glycerin - you don't really need glycerin but it helps the glitter to sloooowly settle at the bottom. I added 3 tablespoons to the small jar and 5 to the large one!

Step 4 - Fill the jar up with water, to the rim of the jar, some water will spill out when you put the lid on...
 
Glitter and Water

Step 5 - Screw the lid on VERY tightly!
 
Lid On

 Step 6 - Turn over and shake...... And Ta Dah.... SNOW GLOBE!

So Pretty

The snow globes are a big hit! They are ridiculously easy to make and QUICK! And when added to the others we have at home, they look Fabulous! Oh and did I mention that I LOVE snow globes..... xxx

Our Collection

Saturday 7 December 2013

Oooh Mommy Jam!

My beloved little sister is back - YAYAYYY!!!!! Where has she been I hear you ask ? In Canada, working at summer camp! I cannot tell you what a JOY it is to have her home, we skype, face time and all that cyber stuff, families do when they are far away...... but to have her home, here with me, on the estate makes me GIDDY with Joy and Excitement!  My Sister is the best and we just seem to 'get' each other! So enough of my-sisterly-love-thing...

I also love having here home because she always brings new and exciting idea's with her.... remember the Carrot Cake Jam last year and the Date Coffee Health Bar thingy the year before?  Weeeeeelll she didn't disappoint! No Siree... want to know what it is this year...... Wait for it..... BACON JAM!! I can hear a collective EUWWWWWWW, which to be perfectly honest was my exact thought but boy am I wrong, and I hate to ever admit that I am wrong.....  She says she heard about it from the head chef  at camp, Andre, was intrigued and  googled  the recipe...... well of course we had to  try it, now didn't we....

I was making a Christmas cake for some friends and Cin got stuck in, very soon the smell of bacon frying was everywhere and to be honest besides garlic and onion there is nothing quite like the smell of fried bacon.  It gets the taste buds going, it make you salivate, makes you want to eat......I honestly think that if you really want to make things taste finger licking good, just add BACON. Think about it most of the TV chefs add BACON and really I don't know anyone who doesn't like a good ole BACON and eggs for breaky!

Chopping Bacon at Warp Speed

Lots of Onions....

And Garlic.....


Canadian Maple Syrup

Busy Reducing....


Bacon Jam
 So now for the recipe....

Cindy's Bacon Jam

1 kg Bacon(cut in to inch chunks)
4 large Onions (peeled and thinly sliced)
8 Cloves of Garlic
1 cup Apple Cider Vinegar
1/2 cup of Maple Syrup
1 1/2 cups of Black Coffee
Freshly Ground Black Pepper

Fry the Bacon until it is browned(remove from pan and drain on kitchen paper)
Add the onions and garlic, and gently fry until the onion become translucent
Add the remaining ingredients and drop the heat to low
Then bring to the boil for about 2 min, then add the Bacon back in
Simmer uncovered and stir occasionally, add a bit of water if it looks too dry(ours never looked to dry)
When it all look melty and syrupy , take of the heat and allow to stand for 5 minutes.
Blintz in the food processor, so that the consistency is spreadable...... at this stage you are going to want to APPLY to mouth, but it needs to be bottled like you would pickles or jam!

It can be kept in the fridge for about a month(it will never last that long) or freeze it so you have it when ever you want, and you are going to want lots of it!

A debate raged on as to how we thought it would be best served, with eggs on crusty bread, was one option, chicken sandwiches, was another..... then the creative juices really started to flow... biscuits with cottage cheese and a blob of BACON JAM, French toast, goats milk cheese and French loaf... But in the old end, we chose to try something quite ordinary, which turned into something quiet extraordinary with BACON Jam on it, a plain old toasted cheese!


A Toasted Cheese and Bacon Jam Sandwich!


 It was mouth watering, it was finger licking, it was lip smacking, in actual fact there are not enough superlatives to describe this sweet and savour masterpiece!


All too soon it was finished and we had to stop ourselves from rushing into the kitchen to make more sandwiches! I know that over the next few weeks we are going to expend alot of time and energy on thinking up marvellous ways to eat BACON Jam. And they will all be worth it, as the author of this blog Foodie with Family calls this delicious Jam - OooH-Mommy! Jam and boy is it just that! But as you know, don't take my word for it, go on I dare you .... Try it! xxx 


Friday 6 December 2013

Promises,Rings.....And A Cake!

 
I am not someone who says no easily, you see I have a very giving streak, I REALLY REALLY  like to help people out, so I very often say yes with out thinking  twice and this loving-helping-everyone-I-can thing, can this get me into a total knot! I don't check my trusted monthly planner that is always on my fridge, and when I do , suddenly there are things on it that I don't even remember....... like my friend Helie's wedding, she had asked me months ago if I could make her wedding cake and help out with a few bits and bobs..... Now the bits and bobs were not the problem.... But suddenly I was confronted with producing a in her partner Kim's words "an elegant and beautiful cake" I had only ever made cartoon-like cakes, FOR Children, and they are not judgemental, really, as long as it has icing/frosting on it - you have pretty much nailed it!!  
 
Panic stations set in, could I do it, would I be able to make the roses that had been requested, panic, PaNiC, PAAAANNNNIIIICCCC!!!! But I had said YES!!! So I had to at least try, I mean, I could always rush to out local Bakery and beg a cake from them if it all went horribly wrong......
  
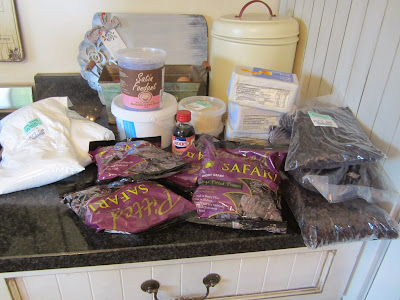
Ingredients Ready and Waiting
I decided on a fruit cake, as it is very hard to get that wrong, also I had a secret weapon,  NIGELLA's Chocolate fruit cake. It really is so  good, no nuts and cherries, but prunes, coffee liqueur and chocolate - My mouth is watering! Making 2 fruit cakes back to back is long work, certainly not difficult but loooonnnggg! And after about 5 hours I had produced 2 beautifully even and irresistible smelling cakes - the added bonus was,  the house smelt like my favourite time of the year - CHRISTMAS!
 
The recipe takes loads of preparation, but once the prep work is all done the rest is pretty simple! You want the recipe.......Of course you do.....

Nigella's Chocolate Fruit Cake

350 grams dried soft prunes, chopped 
  • 250 grams raisins
  • 125 grams currants
  • 175 grams butter
  • 175 grams dark muscovado sugar( I could find Muscovado so I used plain old brown ) 
  • 175 ml honey
  • 125 ml Tia Maria or any coffee liqueur
  • 2 oranges, zested and juiced
  • 1 teaspoon mixed spice
  • 2  generous(I am VERY generous) tablespoons  cocoa
  • 3  eggs, beaten
  • 150 grams plain flour
  • 75 grams ground almonds
  • 1/2 teaspoon baking powder
  • 1/2 teaspoon baking soda

  •  
     
    Preheat the oven to 150 degrees C.

    Line the sides and bottom of an 8 by 3 1/2-inch deep, round loose-bottomed cake tin with a layer of reusable silicon baking parchment. When lining the tin with the parchment, cut the material into strips that are twice as high as the tin itself (it is easier to use two shorter strips of parchment, than one long strip); the height of the strips protects the cake from catching on the outside of the cake tin.

    Place the fruit, butter, sugar, honey, coffee liqueur, orange zest and juice, mixed spice and cocoa into a large wide pot. Heat the mixture until it reaches a gentle boil, stirring the mixture as the butter melts. Let the mixture simmer for 10 minutes. Remove the saucepan from the heat and leave to stand for 30 minutes.

    After 30 minutes, the mixture will have cooled a little. Add the eggs, flour, ground almonds, baking powder and baking soda, and mix well with a wooden spoon or spatula until the ingredients have combined.

    Carefully pour the fruitcake mixture into the lined cake tin. Transfer the cake tin to the oven and bake for 1 3/4 to 2 hours, or until the top of the cake is firm but will has a shiny and sticky look. At this point, if you insert a sharp knife into the middle of the cake, the cake should still be a little uncooked in the middle.

    Place the cake on a cooling rack. Once the cake has cooled, remove it from the tin.
     
    When I am not making a wedding cake.....I usually decorate it with chocolate ball, gold edible balls and GLITTER of course!
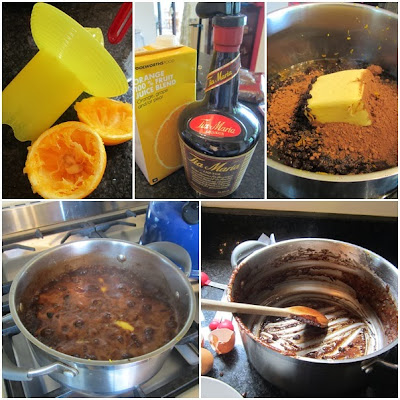


    The Baking!

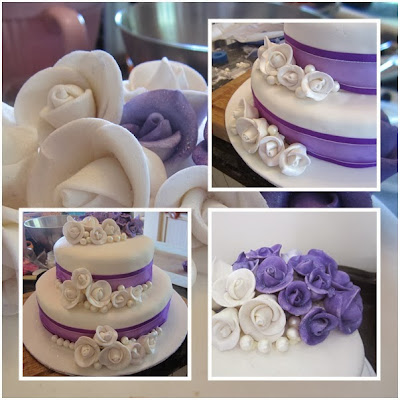
    Luckily for me the cake could all be made is stages, so next was on to lots and lots and LOTS of fondant roses, my lovely cousin Viv, loaned me some rose moulds, but I had a picture in my mind, those beautiful 3D roses on all the amazing cake you see and pin on Pintrest!!! A little ambitious for me, since I have never made a 3D rose before! But as you all know I am a animal with lots of perseverance, I hauled out Little Madame's play dough and practised with that!  I had  seen roses, in a local bake shop and was sure I could reproduce them - so I made little cone shapes, then cut out circles and added them, layering as I went, and shaping the petals, it worked although the bottom were thick, I could sort that out..... I was now a little less now stressed! (Actually, I cannot lie, I was still very stressed!)
     
    The Roses and Dirt Icing

    
    The week before the wedding I iced the cakes, 2 layers of butter icing(dirt icing as my cheffy type sister calls it) and the  fondant layer. This was all actually very easy and it went very smoothly! I was now really stressing a whole lot less!! Really I was!  
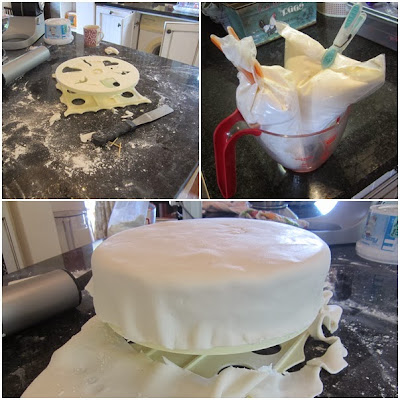

    
    The Fondant Layer!

    And so I was nearly done, when the phone ran, 'Could you please also make 50 cupcakes?' - WHAT??? 'Yes Darling no problem!' was out of my BIG FAT MOUTH before I could stop it!! REALLY, what on earth was I thinking, was I completely off my tree?? YES I hear you all yell! and YES is certainly what I was thinking! Thankfully 2 things happened at the same time. No1 - I remembered I had not given Viv her rose mould back  - and No 2 - the beloved Cheffy sister arrived in the fishing village! WHEW!! so on the morning before the wedding, we made 52 cupcakes(my recipe - here) and 60 tiny little roses from Viv's moulds and we did the placing of roses- well said Cheffy Sister did more placing than me - I was too busy fighting TINY TEENY little roses out of moulds(Viv, you said they were easy!)
     

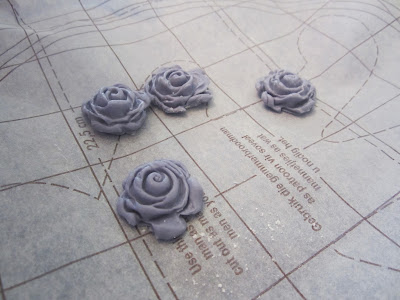
    Gorgeous But Frustrating Little Roses!

    Cupcakes
    Rose Placement Was Epic!

    Finally we were happy, it was done, I had actually made a wedding cake - me, little old me( and cheffy darling sister- of course), and it looked gorgeous, really 'elegant and beautiful' which was the two words that kept dancing around in my head! We finished the cupcakes, packed them in the car and headed for the venue - at SNAILS PACE, motorists back up behind us and blasted their hooters(horns - for my American readers)But I was taking no chances with this Masterpiece!  
     

    Elegant and Beautiful!

    I was happy but would the loving couple be? Would it be a cake they would remember? A cake they would talk about in years to come..... Helie was ecstatic and Kim was speechless so I guess they  were.... as for me, I was exhausted!
     
    The wedding was the next day, it was filled with laughter and so much LOVE! Helie was a beautiful bride and Kim was elegant, I know they will love each other forever..... its just that kind of love, and I am so glad I could help them just a tiny little bit! xxx


    PS: So Glad I can't say No!

    Thursday 5 December 2013

    Pffft Ramsbottom...... hahahahaha!

      
    Did you lovely peeps look at the post title and think, 'Yip, she has finally  lost it!" Well to be totally honest I would not blame you, except that its not madness its LOVE ! LoVe I tell you LoVe !!! I have fallen totally and unreservedly in love with MINIONS! Whations??? I hear you ask , well for those of you with movie-going-children, you know would know,  they are the sweet adorable little yellow characters in Dispicable Me 2, and for those of you without children - WHERE HAVE YOU BEEN????
     
    They are funny little yellow things that look like beans, they have a language all of their own, they sing and dance, do all Gru's dirty work and did I mention they are  FUNNY!! Little Madame and I watch them on you tube and roll about laughing, so did I mention that they are FUNNY!! I have even relented and allow the family to eat at the Mickey D's, just because there are the toy with the happy meal...........
     
    Soooo, I was trawling Pintrest the other night when I came across crocheted Minions - Oh JoY Oh RaPtUrE!!!!!! I saved it and the very next morning printed the pattern out to make one for MYSELF! Yes for me! But alas the pattern was a bit difficult and I found my self doing my own thing, so I began to write it all down and what follows is my very own minion pattern, and my sweet funny little minion!   
     
    Minion  Body
     You will need:  Yellow Wool
                               Blue Wool 
                               Black Wool 
                               Grey Wool(a tiny bit) 
                               Googly Eyes 
     
    Size 4 hook 
     
     
    Body:
     
    Rnd 1 - chain 4 and slip stitch to make a circle. Sc 6 into this circle
    Rnd 2 - Inc into the 6 sc (12)
    Rnd 3 - Inc then sc into the next sc - repeat all the way around (18)
    Rnd 4 - Inc then sc into the next  2 sc - repeat all the way around (24)
    Rnd 5 - Inc then sc into the next  3 sc - repeat all the way around (30)
    Rnd 6 - 20 sc all the way round -  I count or I become confused - but I am Blonde
    Rnd 21 -  sc into the next 3 then dec  - repeat all the way around(24) 
    Rnd 22 -  sc into the next 2 then dec  - repeat all the way around(18)
    Stuff your little minion now
    Rnd 23 -  sc into the next sc then dec  - repeat all the way around(12)
    Now keep decreasing until you have closed the hole. Fasten off and sew in the ends


    Minion Arms
     
    Arms:(make 2)
     
    
    Rnd 1 - Chain 11
    Rnd 2 - turn sc in the 2nd chain stitch, sc across
    Repeat until you have 10 rows. finish off and leave  long piece of yarn .
    Now roll up the little rectangle and sew it together -  arms done


    Minion Overall
    Overall:

    Rnd 1 - chain 4 and slip stitch to make a circle. Sc 6 into this circle
    Rnd 2 - Inc into the 6 sc (12)
    Rnd 3 - Inc then sc into the next sc - repeat all the way around (18)
    Rnd 4 - Inc then sc into the next  2 sc - repeat all the way around (24)
    Rnd 5 - Inc then sc into the next  3 sc - repeat all the way around (30)
    Rnd 6 - 13 sc all the way around
    Rnd 7 -sc 10 then turn chain 1 then sc cross all 10 stitches, do this 2 times(forming the bib part of the overall = 3 rows of single crochet)
    then chain 20(this is the strap)
    Now go back to the front bib and count 8 stitches then slip stitch into the 8th stitch.This is where your back bib will be.
    sc 5, turn 1 chain and sc across the 5 stitches, chain 17 and slip stitch it to the front bib and fasten off!

    Pocket:

    Chain 4 turn and sc across all 4 chain stitches do this 4 times (4 rows).
    sew onto the middle of the front bib!

    Dressed Minion

    Arms And Eyes
    Goggles: (grey wool)
    First off double you wool, the goggles must be thick.
    Chain 13 and join to form a circle. makes 2
    Then sew them together in the middle
    Change to black wool
    Join the black wool to the side of one goggle, then make about 40 chain stitches(measure around your minions head)
    Slip stitch the end into the other side of the goggle. sew the ends in


    Minion Goggles
     
    Boots and Hands:
     
    I cannot tell a lie..... I struggled with the boots and hands, I eventually got the boots right BUT did not write down the pattern and if I had to try and give it to you......Well it would be a mess and then you would be cross with me.... So my poor little Minion has wonky boots and alas NO hands as I just could not get the hands right either!!!  PLEASE if any of you have a pattern for hands and boots - I would be for ever grateful...... And please forgive me for an incomplete pattern!!
     
    Boots.......
    So although my funny little Minion has no hands, he is still very cute! He lives with all Little Madams Minions in her room, I mean did I honestly think he was mine to keep...... Every time I walk into her room I have to smile, there he sits on the shelve, as sweet as can be, waiting for the dead of night to make MINION MISCHIEF! xxx


    Sweet Little Minion
      

    Wednesday 4 December 2013

    Headway Has My Heart!

    
    Today was one of the days I have been dreading for weeks now, Little Madame's last day at Pre School! There were tears, Big Fat crocodile tears! Now please don't get me wrong.... I am very happy for her to be moving onto "big" school, but the thought of her leaving this school has brought me to me knee's! Why I hear you all ask.... Well it's the people who own, run and teach at this absolutely AMAZING place, and I call it place because "school" is not the right word for it!  I cannot bear the thought of not seeing them every day, saying Hi, watch them laugh and hug the children! Nurture them and love them as though they are the only children in the world!  

    From the first day that LSO and I walked into Headway and met the BEAUTIFUL and SERENE, Mrs Krummeck ( have put those words into shouty capital because - she really is beautiful and serene) Heard her talk with such passion about the school and teachers, put us at easy about our one and only, we knew that this school was where we wanted our little angel to be!
     
    The first day was traumatic for me and thank the good Lord above that my beloved sister was with me, I was the one being pulled away from Little Madame(and I think I would have sat outside in my car and waited until 12 to fetch her, if Cin had of allowed me to) I need not have feared as the gorgeous Miss Hughes and Miss Blackman made her so welcome, Little Madame was instant in love with Jenna and all I heard for the rest of the year was Miss Hughes says this ...... and Miss Hughes says that...... In short Miss Hughes was/is her IDOL! Now I must confess, I also had/have a bit of a girly crush on the lovely Miss Hughes, who turned out to be a kindred spirit, she bakes, sews and is exceptionally creative!(Although I have yet to teach her to crochet) Sound familiar??? 
      
    Fun Days
    Every single function that we have attended at the school has been awesome, Mothers day picnics, Daddy date night, Grandparents morning and  OH THE CONCERTS, don't get me started on those..... Last year was all about a Little Rainbow  Fish, complete with Mermaids, Sharks, and Jeremiah the Bullfrog(Chris the general handyman) Who stole the show!  This year was Round the World! Can Can dancers, French soldiers, Indian dancing girls, American Cowgirls, and ending with a rendition of HEAL THE WORLD! There was not a dry eye among the Moms and DADS!(Yes Dads, I saw you wiping tears away too ) How Mrs Krummeck and  all the teachers get all these little angels to perform an hour long concert is mind boggling..... But they do!

    Christmas Concert Night!

     
    Moms Morning!

    Grade R came as quite a shock to Little Madame! More structured, a uniform and without her beloved Thomas!(she told me on the first day of school that she had met the man she was going to marry, this was the quite and sweet Thomas) Her BFF Bella had gone off to another school too. There were tears! But not for long because in stepped Mrs Calmeyer the LADY of the school. Now I call her this because she is the epitome of LADY, calm yet fun, strict yet gentle, always looks beautiful and  is absolutely  and firmly in charge, the perfect transitional teacher! I must say that when I  first  met her I felt like I was about 10 years old again....but as with all the wonderful teachers at this school, I have grown to absolutely adore her!(and her wonderful husband) Her assistant teacher and the person, who is possibly the most willing person I know is Mrs Nicholson.  She helps with everything, knows everything and everyone, in short she is the go-to-person!(and according to Little Madame,  she is the best at ZULU!)     
      

    The Class of 2013

    And so we must move on..... Will her new school prove to be as AWESOME, we will wait and see. Its is a different ball game, for me as well as for her. I have no doubt she will adapt quickly and happily..... Me not so much! I don't like saying goodbye, I don't like leaving the familiar behind! I like being around people with positive and HAPPY minds and HEARTS! And that in short is Headway.... And so to all the beautiful teachers and people(Keith and Francine) who make Headway the most amazing school, Thank you for the last 2 years they have be the BEST and I will not say goodbye, in actual fact I refuse to say goodbye, I also know that I don't have to because I have made life long friends at Headway! So see you next year Headway Gang! Francine, I will be visiting for Hazelnut Coffee and long chats! xxx

    Hand On Heart for Headway!


    Tuesday 3 December 2013

    I Can't Believe......

    Helloooooooo, I can not believe that it has been more than 2 months since my last ramblings.... I have been away(far away in a Magical Kingdom), and very VeRy VERY busy since I got back, and if I look back at my blog posts from last year this time, it would seem that I was as flat out busy then as I am now!
     
    I have done so much and have so much to tell you.... I think that it will take at least 4 or 5 posts to get it all down, so BRACE yourselves, you have a lot of reading to do...... To those of you who have mailed me to ask where I am, thank you it makes the heart warm and happy to know that I am missed here in Blog land.
     
    So here are a few picture to wet the appetite ......
     
    I Crocheted A Minion!

    
    Sorted Out My Mollie Makes

    
    Made A Birthday Cake

    
    I Went Away....

    
    Can You Guess Where

    
    Walked On A Beach In Maine

    
    Visited The Cake Boss

    And A Magical Castle

    Little Madame Met A "Real Princess"

    Drove My Dream Car......
     And soooooo much more........So watch this spot, lots of posts to come..... xxx